OpenNMS continues to invest in Kubernetes. One example is the ability to deploy OpenNMS and OAuth in Kubernetes with Keycloak in an external virtual machine for Single Sign-On to OpenNMS. In the blog, I’ll explain how to set this up.
We will utilize AKS, the Azure Kubernetes Service, but a similar approach can be taken with other Kubernetes services like Google GKE and Amazon EKS. It’s very common to implement Keycloak external to the Kubernetes cluster because you’re often leveraging another OAuth provider. This is the preferred set up because it allows you to use a reverse proxy for your ingress, or input, for Kubernetes services.
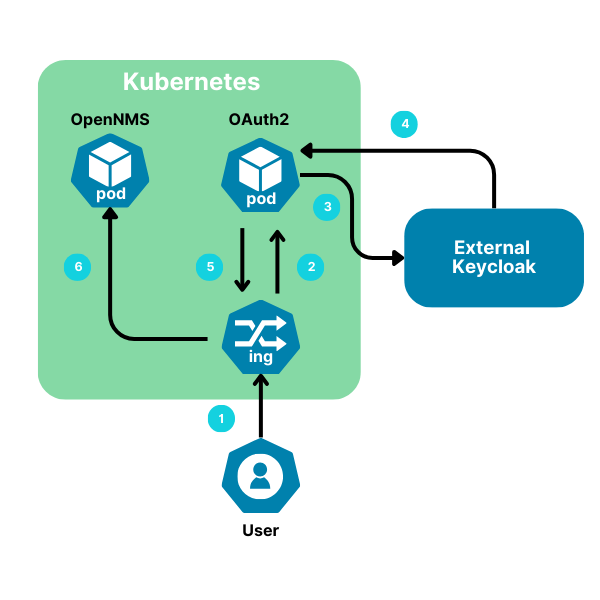
1) Use Azure Kubernetes Service (AKS) to manage and run OpenNMS
- To create an AKS cluster, we need to have an Azure subscription to use “az login” to authenticate to Azure. Next, we create the AKS cluster by running the command “az aks create --name opennmsAKS --resource-group ericRG --node-vm-size=Standard_D4s_v3 --node-count 3 --network-plugin azure --enable-managed-identity --generate-ssh-keys"
- Once the cluster is created, we need to use the command “az aks get-credentials -n opennmsAKS -g ericRG“ to add the cluster credentials to our ~/user/.kube/config file. This will allow us to run kubectl and helm commands locally to our hosted cluster.
- Associate OpenNMS with a domain to use for public ID to establish Ingress into the Kubernetes cluster. AKS allows you to set this up easily by associating a DNS with the public IP address and creating an alias record using available open domains. This ensures that every time someone goes to a web page to log in, users see the right page. Instead of a static IP address, using DNS through AKS means this will always be available.
- Set up proper ingress and egress rules with the network security group to allow access in and out of the AKS cluster.
2) Use Helm Charts to deploy Postgres, OpenNMS and Oauth2-proxy into the Azure AKS environment
- Utilize kubectl command to apply yaml files for persistent volumes and persistent volume claims for Postgres to run and ensure that those claims were bound.
- Modify the pg_hba.conf file to allow connections. Set the host to “trust” and accept incoming connections. Please note that "trust” is not recommended in a production.
- Run the Postgres override_values.yaml file for Helm Charts. Ensure that the correct version of the Postgres Helm Chart is used to deploy the desired Postgres image. Postgresql needs to be running with a service prior to deploying OpenNMS. Modify the OpenNMS override_values.yaml file so that when OpenNMS starts up it has the correct Postgres service hostname ie postgresql.default.svc.cluster.local to connect to Postgres.
- Use kubectl to create configmaps for OpenNMS to inject into containers. In the OpenNMS override_values.yaml file, ensure that the configmaps are added to the configmap overlay section of the yaml file. Use the helm install command to deploy OpenNMS into the AKS cluster.
3) Use an Azure Virtual Machine (VM) to deploy and run Keycloak as your Identity Provider
- We used Terraform to deploy Keycloak using an Azure VM in its own resource group. Set up the compute, networking, and variables resources for the region you’re going to deploy in. You can use the “random pet” resource to generate the name.
- Create a client within Keycloak and set up proper redirect for the Kubernetes cluster running OpenNMS.
- Create Groups in Keycloak and match the Groups to the Roles in OpenNMS.

- Then add Users to the Groups, which match the way Users are mapped to Roles in OpenNMS.
- Create scopes within the dedicated client scope that define the mapper type of the scope. We created scopes for User Attribute, Group Membership, and Audience. We enabled the ID token, and the Access token for these new mappers.

4) Use Oauth2-proxy as a reverse proxy that provides authentication through OpenID Connect
- Create OAuth2_override_values.yaml with a client ID that matches the client ID within Keycloak.

- Run kubectl commands to create secrets for “client-id”, “client-secret”, and “cookie-secret”. Set up various configs including a redirect that matches the same redirect in Keycloak.
- Set up ingress within OAuth2 proxy by running Helm install with the file for the OAuth2 override_values.yaml. Once that’s deployed, edit the ingress. Use kubectl to edit the ingress to add annotations for auth-response-headers, auth-signin, and auth-url. Ensure that the configuration is correct for the ingress so traffic can be redirected properly.
After a successful login, we can see the session in Keycloak:

We can retrieve logs by using the kubectl logs command to show the successful authentication with OAuth2 providing a session with the user ID, preferred name and token ID.
10.224.0.39 - 4be98cf9-2a2e-47e0-9f89-90d3ff125b57 - - [2024/09/06 15:44:01] 10.224.0.46:4180 GET - "/ready" HTTP/1.1 "kube-probe/1.28" 200 2 0.001
<ipaddr of user> - 9cf718a02e532f5c15496007e856201a - [email protected] [2024/09/06 15:44:10] [AuthSuccess] Authenticated via OAuth2: Session{email:[email protected] user:7c5d4517-c661-4da8-af8b-2cf77d9203ce PreferredUsername:admin token:true id_token:true created:2024-09-06 15:44:10.038741196 +0000 UTC m=+830082.679460959 expires:2024-09-06 15:49:10.038287167 +0000 UTC m=+830382.679006930 refresh_token:true groups:[ROLE_ADMIN ROLE_USER]}
Conclusion
We hope this blog has raised your interest in setting up SSO for OpenNMS within a Kubernetes cluster and an external Keycloak instance. If you’d like to see it in action, contact us to set up a demo or give it a try yourself!
Learn how OpenNMS Meridian can make it easier to monitor your enterprise network here.

